Camera (Add CCTV)
Navigation: Airfob Pro portal > Device Management > Camera
Airfob Pro portal and Pro app can automatically detect IP cameras that are connected to the same
network as an Airfob Edge Reader.
The cameras use the reader as a gateway,
eliminating the need for an NVR (Network Video Recorder). Instead, the
cameras utilize the built-in SD card storage.\

Check the requirements for the IP camera.
- Onvif profile: The IP camera must be compatible with Onvif profiles S or T.
- The camera must have a built-in SD card.
- It must use the same network as the Airfob Edge Reader.
- We have excellent compatibility with Hanwha cameras. Compatibility with other brands may vary depending on their adherence to Onvif profiles.
- If you have other camera brands that you would
like to test, our team can assist you through the process
Video feature Setting up Process
- Access to the Airfob Pro portal with the site Master account.
- Enable the Video feature from the Setting > Site menu.
- Add a camera from the Device Management > Camera menu.
- Associate camera with door from the Registered Door menu.
- You set everything to view the videos in real time.
Activate the Video feature
The video feature is disabled by default. To enable video on your site, you need to access your site with a Master account and change your site settings.
Enabling video on your site
- Access the Airfob Pro portal with your master account.
- In the Settings > Site menu, go to the Additional Features tab.
- Click the gray toggle to the right of Video Management to switch it to green (green: enabled, gray: disabled).
- The following hidden video-related menus will appear in the portal
Video Playing Time in the Event logs
The green 'Setting >' button next to the Video management allow you to set the time to start playing the video for a specific event in the Event Logs menu.
If you set it to -5 seconds, as shown in the image above, the video will play starting 5 seconds before the event occurred.
- Click the Settings > button to the right of the "Video Management" text.
- The Video settings popup will appear.
- Move the white circle above the horizontal bar to where you want it.
- Click the Save button.
- For events with video in the Event log menu, you can play the video starting 5 seconds before the event occurred.
Adding installed Cameras
After you enable video management on your site, all menus related to cameras (videos) will appear.
In the Device Management > Cameras menu, you need to add installed cameras to view their videos in the Airfob Pro portal and app.
IP cameras connected to the same network as your Airfob device can be automatically detected. Please check the eligible cameras above first.
- When you enable video management on your site, all menus related to cameras (video) appear.
- Go to the Device Management > Cameras menu.
- Click the + Add Camera button in the top right corner.
- All cameras that you can add will automatically appear. The camera must be connected to the same network as the Airfob device.
- Enter a name for the camera (such as where it's installed).
- Enter the ID and password that you already have from the camera's vendor or manufacturer.
- Click the Save button, and the new camera is registered to view video in the portal.
Edit Camera
In the Device Management > Cameras menu, click the name area of a registered camera to edit the camera's basic information.
You can freely change the camera's nick name, or change the profile (resolution, etc.) that the camera supports. 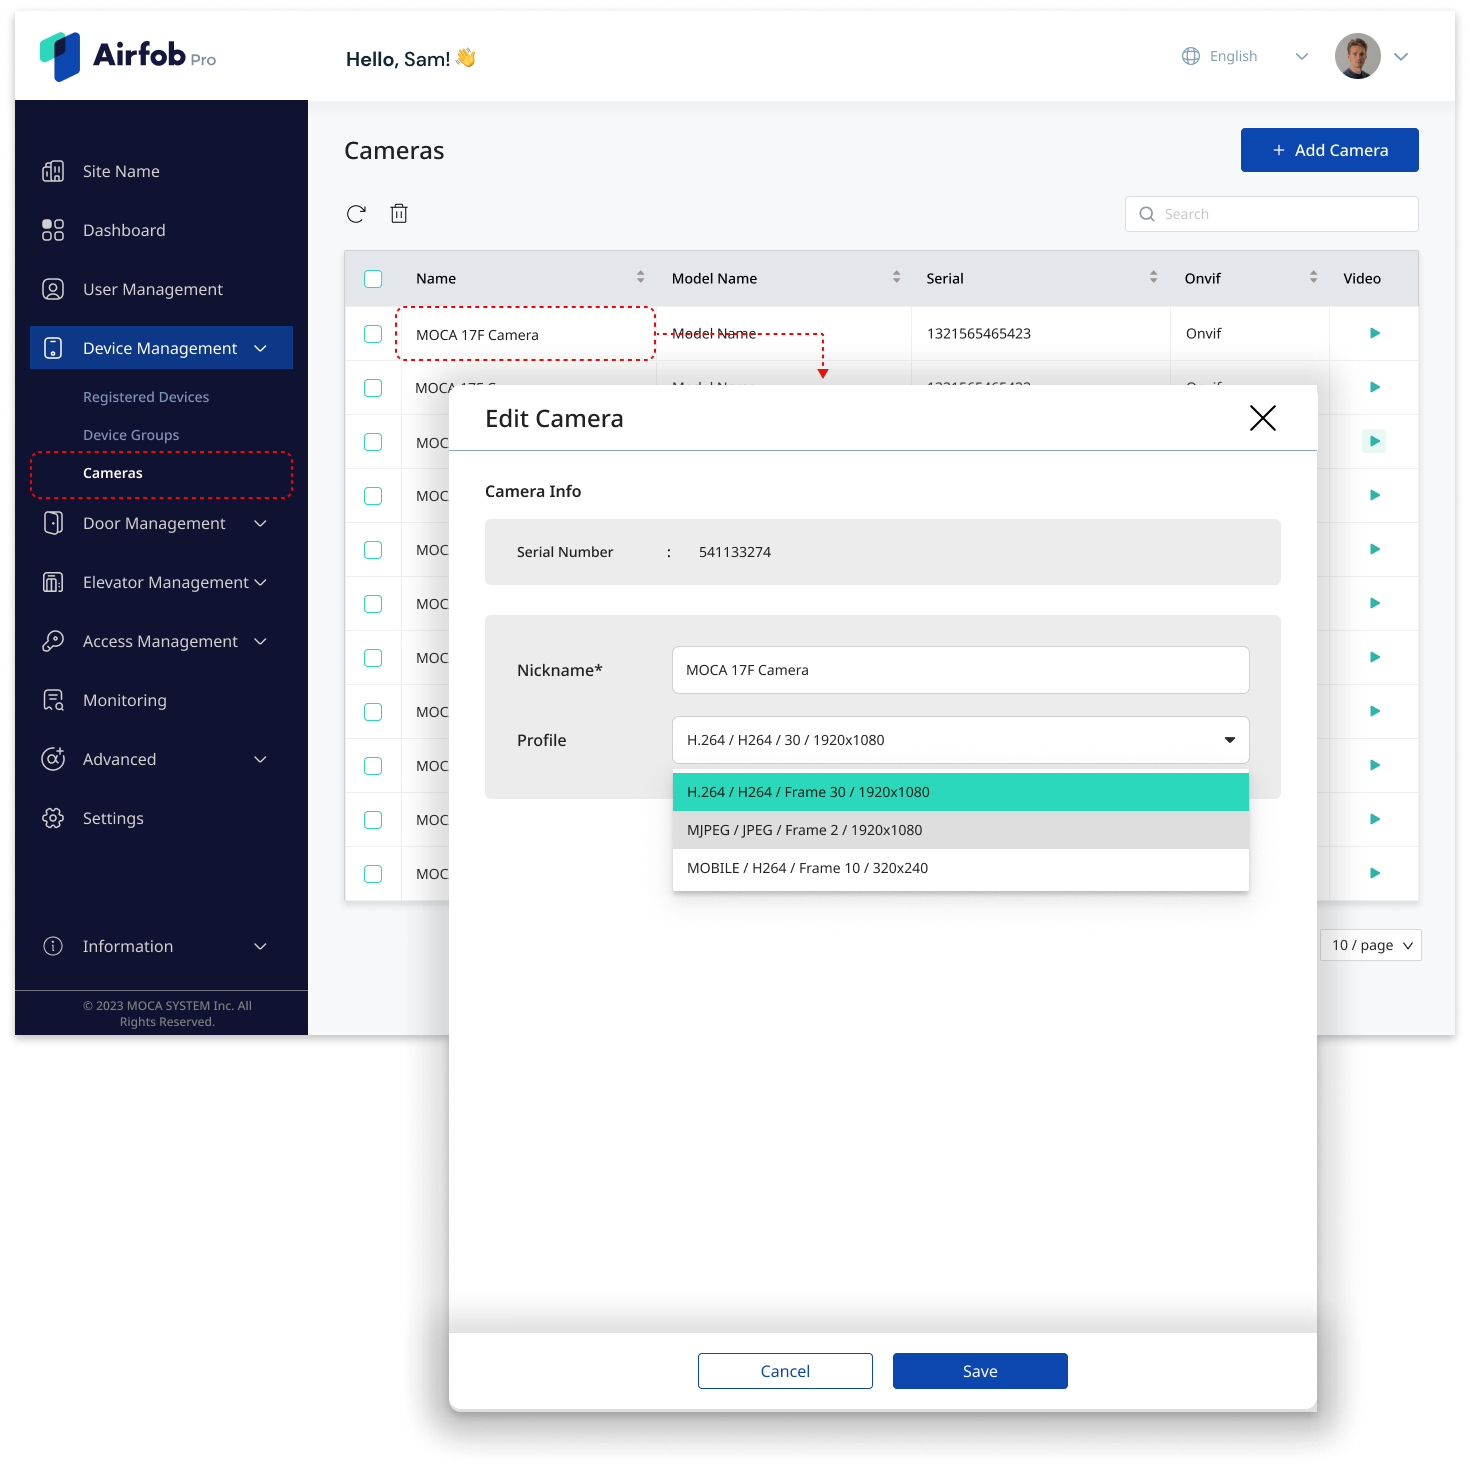
Associate the cameras to doors
If you have a camera (such as CCTV) installed near a door, you can connect it to the door from the portal.
When an event occurs at the connected door, you can view the event and video simultaneously in the event log.
- Complete the camera registration from the Camera menu.
- Go to the Door Management > Registered doors menu.
- Select an already registered door from the list, or you can add a new door.
- In the Edit Door pop-up, you can select the camera that will cover the door.
- Click the Save button to finalize the door settings.
Related Articles
Airfob Space IP Camera Support
Tags: #CCTV #ONVIF #VMS Overview Airfob Pro can automatically detect IP cameras that are connected to the same network as an Airfob Edge Reader. The cameras use the reader as a gateway, eliminating the need for an NVR (Network Video Recorder). ...Schedules (Add new schedules)
Schedules are the days and hours that you want to allow users to enter and exit by authenticating with a mobile card of your site. In the Schedule menu, you can create different time-of-day criteria for opening a particular door, such as business ...Add User (1. How to add individual user)
Route: Airfob Pro Portal > User Management > User > Add User A user is any employee, member, or visitor who comes to a space where an Airfob Space is installed. After creating a site, you need to register users before issuing mobile cards or adding ...Add User (2. How to add bulk user)
Navigation: Airfob Pro portal > User Management > User > Add user > Import User Sometimes you need to register a large number of users at once, such as when you open a new site or a university has just started a new semester. By uploading a CSV file, ...Admin (How to add new administrator)
People who manage the Airfob Space are called admins, and they are divided into four permissions based on the range of tasks they can handle. You can send an invitation email to add new admins, change the permissions or account status of registered ...